Back to CapitalForecastDirect Main Menu
Importing Equipment
The Equipment Import feature is the easiest way to mass-add or update equipment and asset information into CapitalForecastDirect. Whether you’re entering your equipment inventory for the first time, inventorying your existing equipment, or assessing their condition this import feature can help you save time by:
- Updating or adding up to 700 new equipment records per import.
- Automatically activating disabled Locations, Buildings, and Areas in CapitalForecastDirect and assigning them to your equipment.
- Adding new Manufacturers, Suppliers, Condition Codes, Life Expectancy Units, Warranties, Groups, Classifications, and Types, then automatically assigning them to your equipment.
*Note: If you own the Asset Essentials integration feature, you are unable to add equipment through CapitalForecastDirect. All new equipment must be added through Asset Essentials.
How to Import New Equipment
To import new equipment, you will use an Excel template available in your account to fill in the information that is necessary when adding equipment.
Watch the Video Tutorial:

Downloading and Using the Template
- Click on the Import Data link under the Information & Analysis section of your home page.
- Hover your mouse over the Shortcuts menu and click on Import.
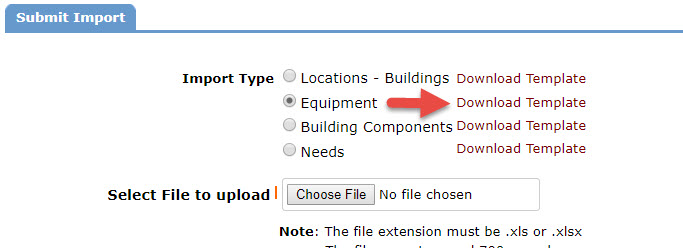
- Click on the Download Template link next to Equipment and open the file.
- The Equipment Import Template spreadsheet will open in Excel. Each row in the spreadsheet will be a new piece of equipment that is imported into your account and each column represents information that can be added to the equipment you are importing.
- The following fields are recommended when importing equipment:
- Item Number- The item number is the unique identifier for a piece of equipment. If left blank, the system will automatically generate a unique Item Number for the piece of equipment. We recommend creating your own Item number descriptive enough that it tells you what the piece of equipment is and where it is located (Ex: Boiler-001-Admin). Consistency in your naming convention will help you locate equipment more easily in the future.
- Location - enter an existing location from your CapitalForecastDirect account. *Note: Location must be entered exactly as seen in your account.
- Building - if you use Buildings you can enter one of your existing Building names here. *Note: Building must be entered exactly as seen in your account.
- Classification - enter one of the existing Classifications in your account. If you do not have a Classification that matches the equipment you are entering, type a new Classification in the cell and it will automatically be added to your account when the data is imported. This field is important if you plan on using PMDirect, our preventative maintenance solution, to manage scheduled maintenance on a piece of equipment. *Note: We recommend taking time to ensure existing Classifications entered on the spreadsheet are entered without any misspellings. This will create a duplicate, misspelled Classification when the import is accepted.
- Type - enter one of the existing Types in your account. If you do not have a Type that matches the equipment you are entering, enter a new Type in the cell and it will automatically be added to your account when the data is imported. This field is important if you plan on using PMDirect, our preventative maintenance solution, to manage scheduled maintenance on a piece of equipment. *Note: We recommend taking time to ensure existing Types entered on the spreadsheet are entered without any misspellings. This will create a duplicate, misspelled Type when the import is accepted.
- All other fields in the spreadsheet are additional information that can be added if desired.
- Save the template file as .xls or .xlsx. Name the file and save it in a location that is easily found on your computer.
Importing the Spreadsheet
- Click on the Import Data link under the Information & Analysis section of your home page.
- Hover your mouse of the Shortcuts menu and click on Import.
- Select Equipment under Import Type.
- Search for the file that you saved and select it to upload.
- Make sure Sheet1 is entered in the Excel Sheet Name. This must match the name of the Excel worksheet in the saved file.
- Click Upload.
- On the Submit Import page, make sure the Field name and the Excel Column Names match.
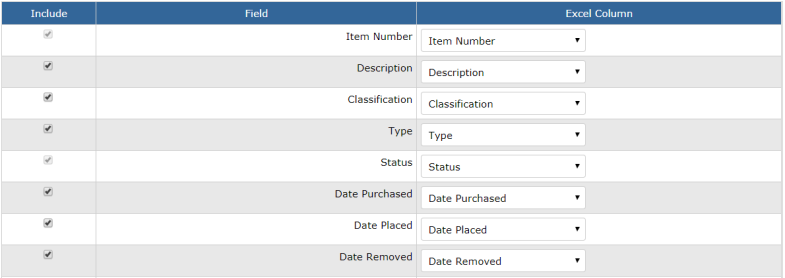
- If you do not want to import data from particular fields, uncheck the box under the Include column.
- Click the Validate button at the bottom of the screen.
- When your file has been accepted on the Import Validation screen, click the Import Data button to import your equipment.
How to Import Updates to Existing Equipment
You may want to use the import tool if you need to batch update fields. You will use the Equipment Master List report to export your current data and import the updates.
Watch the Video Tutorial:

Running the Equipment Master List Report
- Click on Report in the Actions menu and then click on Equipment.
- Use steps 1-21 to filter for the needs that you want to update.
- In Step 22, choose Master List.
- In Step 23, choose Excel.
- In Step 24, click on Print.
- Open the file. This is the Equipment Master List report that will act as your template when importing updates.
- The information from your existing equipment will populate in the spreadsheet. It is important not to change the Item Number, as this is the unique identifier for the piece of equipment.
- Update the other fields as needed.
- Save the template file as .xls or .xlsx. Name the file and save it in a location that is easily found on your computer.
Importing the Spreadsheet
- Click on the Import Data link under the Information & Analysis section of your home page.
- Hover your mouse over the Shortcuts menu and click on Import.
- Select Equipment under Import Type.
- Search for the file that you saved and select it to upload.
- Type Equipment Master List as the Excel Sheet Name. This must match the name of the Excel worksheet in the saved file.
- Click Upload.
- On the Submit Import page, make sure the Field name and the Excel Column Names match. Click the Validate button at the bottom of the screen.
- When your file has been accepted on the Import Validation screen, click the Import Data button to import your updates.
